Appearance
Newsletters
A newsletter is a one-off message sent to a segment at a time you choose.
Create one
- Campaigns → Newsletters → Create Newsletter. This makes a draft called "Newsletter n" and opens the editor, which has three panels.
- Audience. Name the newsletter, then choose A saved segment or An ad-hoc filter. Estimated recipients shows how many contacts would receive it now.
- Email. Choose the sender (only verified senders are offered), then set the From name, Subject and Preheader (the line an inbox shows after the subject; it needs an email made in the designer first). Under Email body, press Design email to open the email designer. You do not type HTML. You can also use Load template and Save as template here. See Templates.
- Press Save draft.
- Schedule. Pick Send at (in the account's timezone, set under Settings → General) and press Schedule. Save first: scheduling sends the saved newsletter.
Only a draft can be edited. Editing needs the Editor or Admin role.
The email designer
Edit design (or Design email) opens the designer full screen, over the menu, on a computer and on a phone. Back returns to the newsletter.
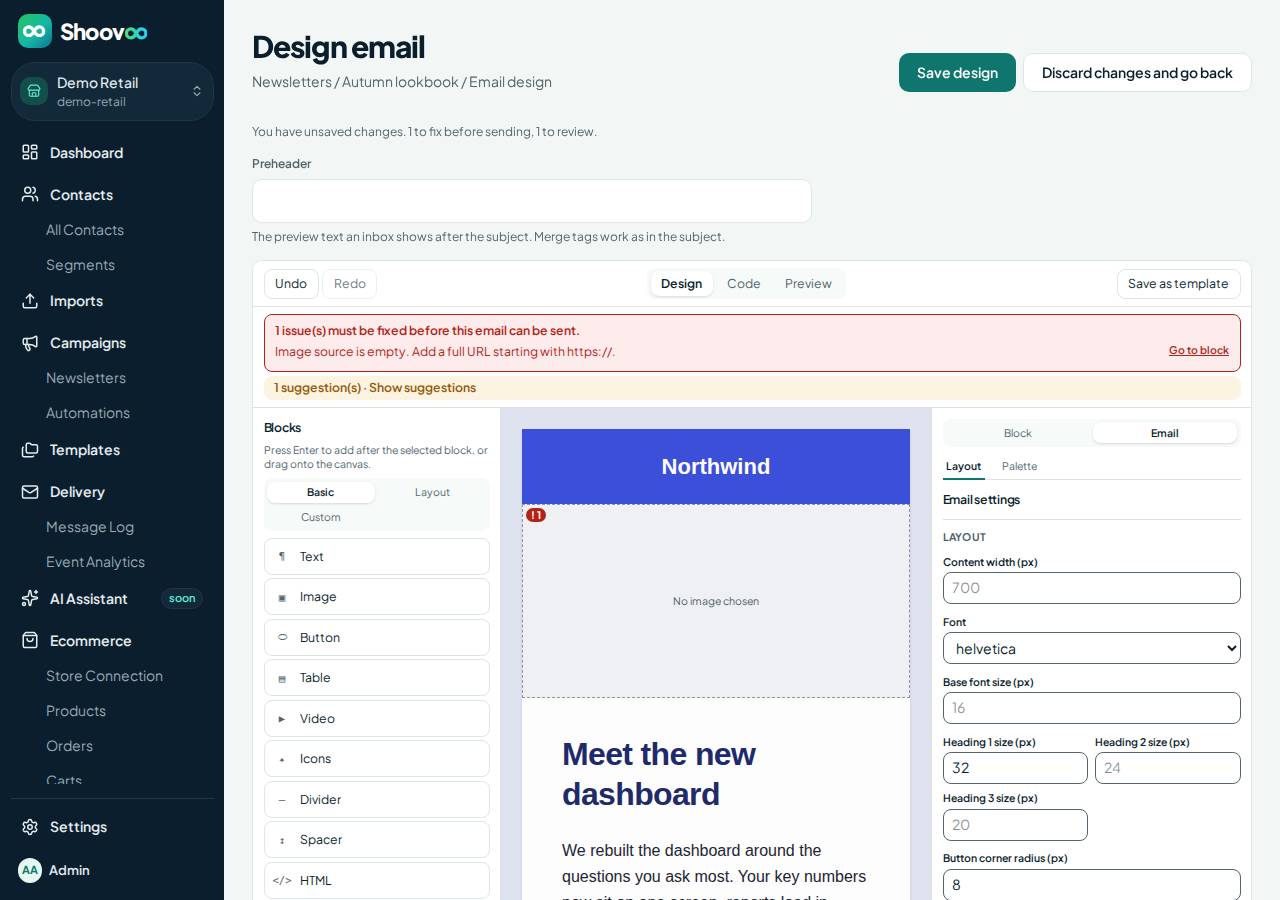
- Choose a starting point on Create a new email (Start from a template, Build from scratch or Import HTML), then add blocks from the Blocks list, by dragging or by pressing Enter on a block. Blocks include text, image, button, columns, divider, spacer, header, footer, social links, table, video and icons, plus product blocks when a store is connected. The Blocks list has Basic, Layout, Custom (and Products with a store) tabs. Select a block to edit it in the Properties panel, which has a Block tab and an Email tab for settings that apply to the whole email.
- To start the email over, choose Remove design beside Edit design on the newsletter and confirm. The email is emptied and saved at once, and the designer then opens on its start page.
- Switch between Design, Code (the HTML that will be sent, read-only while a design is in use) and Preview (desktop or mobile, optionally simulating dark mode).
- Issues lists what must be fixed before sending and what is only a suggestion.
- An image block uploads to your image library. My blocks keeps blocks you saved with Save as custom block, and My templates keeps whole designs saved with Save as template in the designer's toolbar.
- Your brand kit applies when you save.
- Press Save design when you are done (the arrow beside it has Save as template), or Back to leave.
Send a test
In the designer's Preview view, Send a test lists the people on your account. Choose up to five and press Send test. Tests show [TEST] in the subject and made-up contact values, and go only to those people. The test sends the last saved design, so save first.
Templates
Under Templates in the menu you can keep email, SMS and webhook templates. In the newsletter editor, Load template copies a template into the email (a designed one becomes the email's design and is saved at once) and Save as template keeps the current designed email for later.
Brand kit
An Admin sets colours and fonts under Settings → Brand Kit. A change reaches an email when its design is next saved.
Checks before sending
The editor shows problems as you work, and scheduling refuses a newsletter that would fail:
- no unsubscribe link in the body
- missing or broken merge tags and links
- no email content, or no verified sender
- advisory only: spam score, image proportion, subject length
Follow-up steps (Sequence)
A newsletter is usually one email, and that is all you need. The Sequence button at the top of the newsletter opens the same sequence map an automation uses, so you can add steps after the email. The map's first box is the newsletter itself, with its email inside; it is edited on the newsletter's page, not on the map. Add a wait, a condition (for example “opened the email?”), a follow-up email or SMS, or a webhook.
Each recipient goes through the steps on their own, starting when their email is sent. The newsletter counts as sent once every recipient has finished all the steps, so one with a long wait stays in Sending until the last of them is done.
As with the email, the steps can be edited only while the newsletter is a draft. The difference from an automation is what starts it: a newsletter starts for everyone in the audience at the time you scheduled, an automation starts for a contact when a trigger fires.
Status
Draft → Scheduled → Sending → Sent
                      ↕
                    Paused
Cancelled (from Scheduled, Sending or Paused)- Pausing stops further sends, and resuming continues where it stopped. Cancelling ends the newsletter for good: contacts not yet sent to will not receive it. These three actions are available through the API for an Admin (API and webhooks); the editor has no button for them yet.
- Large sends are spread out over time rather than sent in one burst.
The audience is worked out when sending starts, not when you schedule, so people who joined or left the segment in between are handled correctly.
Results appear in Reports: once a newsletter is past draft, press Report at the top of its page.
If you follow a link out of an editor with changes you have not saved, the app asks first, because the work would be lost. Choose Stay on this page to keep editing.